## Description ##
A FusionAuth server [https://fusionauth.io/](http://https://fusionauth.io/) resource repository for running it on RockyLinux 9.x
## Installation ##
To setup your FusionAuth server start out with a fresh RockyLinux 9.x server/vps/LXC - i use a ProxMox (https://www.proxmox.com/en/proxmox-ve) LXC,
and will assumes that your server has:
* (atleast) 4Gb of memory available.
* Firewall ports for Default HTTP/HTTPS should be open(ed).
* (optional) temporary firewall rule to allow port 9011 for initial configuration of FusionAuth.
* SSH acccess to the box.
Out of scope:
* SSL configuration of nginx reverse proxy
###### Install required packages:
```
dnf install wget nano tar unzip postgresql-server postgresql-contrib nginx
```
###### Prepare PostgreSQL server.
```
/usr/bin/postgresql-setup --initdb
```
###### Edit PostgreSQL configfiles for security
```
vi /var/lib/pgsql/data/pg_hba.conf
# change to following line in this file:
host all all 127.0.0.1/32 ident
# to:
host all all 127.0.0.1/32 scram-sha-256
# Save the file after modification.
vi /var/lib/pgsql/data/postgresql.conf
# change the following line in this file:
#password_encryption = md5 # md5 or scram-sha-256
# to:
password_encryption = scram-sha-256 # md5 or scram-sha-256
# Save the file after modification.
```
###### Create Database and user in PostgreSQL
```
systemctl enable postgresql --now
sudo -u postgres psql
postgres=# create database fusionauth;
postgres=# create user fusionauth with encrypted password 'your-supersecret-password';
postgres=# alter database fusionauth owner to fusionauth;
postgres=# \q
```
###### Download latest available version from FusionAuth website (at the time of writing this was 1.51.2)
```
VERSION=$(curl -fsSL https://license.fusionauth.io/api/latest-version)
curl -fsSL https://files.fusionauth.io/products/fusionauth/${VERSION}/fusionauth-app-${VERSION}-1.noarch.rpm > fusionauth-app-${VERSION}-1.noarch.rpm
dnf install -y fusionauth-app-1.51.2-1.noarch.rpm
# OPTIONAL Install for Fusionauth-search
curl -fsSL https://files.fusionauth.io/products/fusionauth/${VERSION}/fusionauth-search-${VERSION}-1.noarch.rpm > fusionauth-search-${VERSION}-1.noarch.rpm
dnf install -y fusionauth-search-1.51.2-1.noarch.rpm
```
###### Enable and Start the fusionauth server.
```
systemctl enable fusionauth-app --now
# if you also installed the optional search-package also start that one.
systemctl enable fusionauth-search --now
```
Your fusionauth server should now be running, and if you opened the port in your firewall available via (http) on port 9011 for initial configuration (See configuration)
###### Configure nginx as reverse proxy to make FusionAuth avaiable over the default HTTP-port.
```
vi /etc/nginx/conf.d/fusionauth.conf
server {
listen 80;
server_name your_server_name;
proxy_set_header Host $host;
proxy_set_header X-Real-IP $remote_addr;
proxy_set_header X-Forwarded-For $proxy_add_x_forwarded_for;
proxy_set_header X-Forwarded-Proto $scheme;
proxy_read_timeout 90;
proxy_http_version 1.1;
location / {
proxy_pass http://localhost:9011;
}
}
```
###### Start and enable nginx reverse proxy server
```
systemctl enable nginx --now
```
Your FusionAuth Server will now be available for configuration via the default HTTP(80) port.
If you had previously opened up port 9011 on your firewall, you can now close it.
## Initial configuration ##
Use a webbrowser and point it to http://server-address on the corect port ( either :9011, of if you set up the reverse proxy, the port can be omitted)
On the initial screen the only thing you will need to change is the password for the database, which you set up in the postgreSQL section:
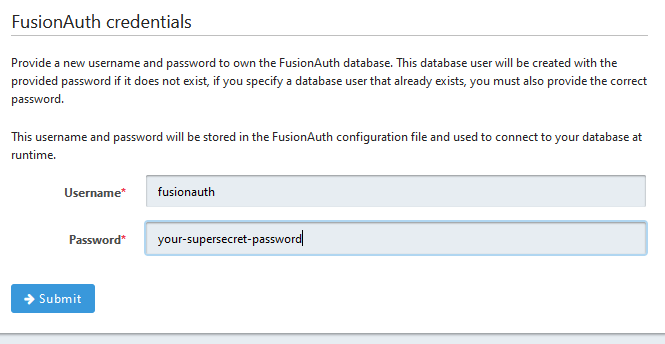
After submitting this information FusionAuth will save it, and then lead you to the screen where you will setup your Admin-User.
**Enjoy your FusionAuth Server !**